Roof inspected
The tile type, roof condition, structure, pitch and mounting requirements are established.

Solar roof fixing and leak risk explained
This is one of the most understandable worries a homeowner can have.
You are taking a roof that currently keeps Scotland's rain outside, putting engineers on it and attaching several hundred kilograms of equipment that may remain there for decades.
You are entitled to know exactly how that is supposed to be done without creating a future leak.

The short answer
But solar installation is real construction work.
Roof coverings are lifted or worked around, structural fixings are installed, rails are attached and people move across the roof.
Poor workmanship can therefore cause damage.
It is that a competent installation should preserve the roof's ability to keep water out, and the mounting system should be designed specifically to achieve that.
Tom Solar visual guide
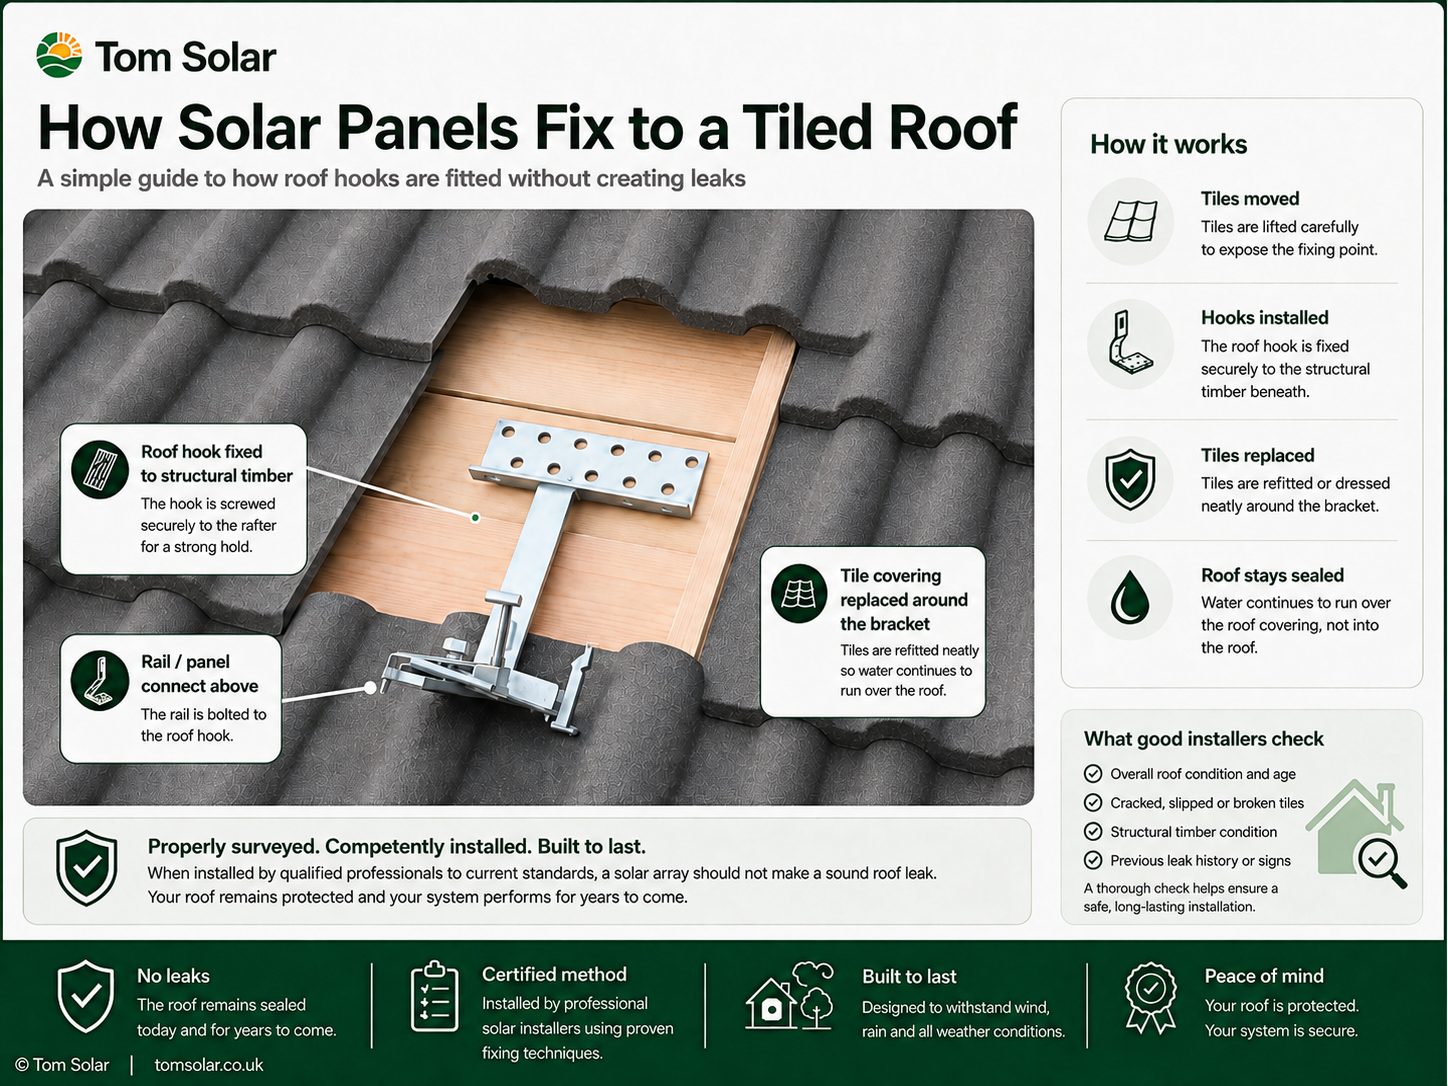
How panels stay on the roof
A rooftop solar array needs to transfer its weight and wind forces safely into the building.
The exact fixing depends on the roof type and certified mounting system.
A common above-roof arrangement is:
A typical tiled-roof installation
The tile type, roof condition, structure, pitch and mounting requirements are established.
Tiles are carefully lifted or removed where the mounting attachments need to be installed.
The attachment is fixed to the appropriate structural member or suitable substrate according to the certified mounting design.
The tile is repositioned and, where required by the system, correctly notched, dressed or otherwise weathered around the fixing.
Aluminium mounting rails are fixed to the roof attachments.
The modules are secured to the rails using compatible clamps in the positions specified by the mounting and module manufacturers.
“Do you drill through my tiles?”
People often picture an installer putting a panel on top of a tile, drilling straight through it and filling the hole with silicone.
That is not a useful model of a proper pitched-roof installation.
Certified mounting systems use purpose-designed roof attachments and weathering arrangements appropriate to the roof type.
MCS 012 specifically addresses weather-tightness and does not simply treat a blob of site-applied sealant as a substitute for a properly designed weatherproof fixing system.
Slate roofs
Natural slate can be extremely durable, but it can also be brittle and unforgiving when disturbed.
The fixing method must therefore be suitable for the particular roof.
Depending on the certified system, the installation may use:
What about broken tiles?
Roof tiles can crack during construction work.
That possibility is precisely why good installation practice matters.
A damaged tile should be replaced or correctly repaired using an appropriate roofing method before it becomes inaccessible beneath the array.
The roof covering beneath the array still has to perform as a roof.
Roof hooks and tiles
MCS requirements specifically address brackets used with fragile coverings such as slate, clay and concrete tiles.
The mounting design must avoid damaging loads on the roof covering, or demonstrate that any permitted load is distributed without causing damage.
A fixing that presses incorrectly onto a tile can turn movement, snow load or foot traffic into a future crack.
Wind loading
Solar panels create an additional surface above the roof.
Wind flowing around the building can create significant uplift.
The mounting design therefore has to consider:
Why roof edges matter
Current MCS guidance normally keeps modules away from the domestic roof edge unless specific additional measures are taken.
Where panels are installed close to an edge, the design may need:
They can be part of the structural, weather and maintenance strategy.
The roof itself
There is little sense installing a long-life solar array over a roof that is already near the end of its useful life.
Before installation, look for:
Removing and reinstalling an entire solar array several years later to replace a failing roof is avoidable expense.
Structural assessment
Current MCS requirements say the roof structure should be checked by a suitably competent person to confirm it can withstand the loads introduced by the PV system.
More unusual roofs can require structural-engineer involvement.
Warning signs can include:
What can actually cause a leak?
A failing tile, flashing detail or underlay problem may already exist before the solar installation begins.
A cracked tile or slate that is not replaced can allow water into the roof construction.
Incorrect clearance, displacement or badly executed weathering can compromise the roof covering.
A fixing intended for one roof type should not be improvised onto another.
Cable and fixing penetrations must be detailed using appropriate, durable methods.
Roofing work, satellite installation, chimney work or other later trades can disturb tiles or solar mounting details.
The pre-installation survey
Before the installation team arrives, somebody should understand the roof.
Useful evidence can include:
They record the condition of the roof before work begins and help the installation team arrive knowing what they are dealing with.
Survey first, sell second
That can be frustrating when the homeowner wants solar immediately.
But installing over a defective roof simply stores up a more expensive problem.
A genuinely independent assessment should be capable of recommending:
Existing roof warranties
If the roof covering is still under warranty, the solar work may affect its terms.
Current MCS requirements say the roof warranty provider should be consulted where the existing covering is under warranty.
If the proposed installation may invalidate that warranty, the customer should be explicitly informed.
Ask before work begins whether any builder, roofing or new-home warranty needs approval or notification.
Bird protection
Bird mesh can be useful around rooftop solar because pigeons and nesting debris can create maintenance problems beneath modules.
But the mesh should be installed using a method compatible with the panel frame and mounting arrangement.
The purpose is to protect the system without compromising the roof or module frame.
If a leak appears later
Water can travel surprisingly far through a roof before appearing on a ceiling.
The visible damp patch may not be directly below the original entry point.
If a leak appears:
Warning signs in a quotation or survey
| What you hear | What I would ask next |
|---|---|
| “It fits any roof.” | Which mounting system is being used and is it certified for my actual roof covering? |
| “We don't need to see the loft.” | How has the roof structure been assessed? |
| “A little silicone seals it.” | What is the certified weathering method for this mounting system? |
| “The roof is probably fine.” | What evidence has actually been recorded about its condition? |
| “We can put panels right to the edge.” | Show me the wind-uplift design and additional measures being used. |
| “Don't worry about that cracked slate.” | Why is a known roof defect being covered instead of corrected? |
Frequently asked questions
Poor installation or damage can cause leaks, but a correctly designed and competently installed PV system should maintain the roof's weather-tightness.
Purpose-designed roof attachments connect the solar mounting structure to the appropriate roof structure or substrate. Rails attach to those fixings and the panels are then clamped to the rails.
No. Proper pitched-roof systems use attachments and weathering arrangements designed for the particular roof covering rather than treating an ordinary tile as the structural fixing.
Slate requires a suitable slate mounting method. Brackets, flashing and replacement weathering details vary with the certified system.
Poorly selected or incorrectly fitted brackets can. Certified systems and correct installation detail are intended to avoid damaging loads on fragile roof coverings.
Yes. Condition and structural suitability should be established before a long-life solar array is installed.
Repairing or replacing the affected roof first may be much more sensible than paying to remove the solar array again a few years later.
Solar mounting systems must be designed for wind forces including uplift. Fixing quantity and spacing depend on the building, location, roof and array position.
It can depend on the warranty terms. Where a roof is still under warranty, the provider should be consulted before installation.
Record the evidence and contact the installer. A competent investigation should determine whether the cause is the solar work, an existing roof defect or something unrelated.
Properly installed bird protection should not require inappropriate roof penetrations or compromise the mounting system.
It should provide enough evidence to understand the roof covering, condition, dimensions, pitch, structure, obstacles, visible defects, access and the fixing method the installer will need.
Not automatically. On-roof panels sit above the weatherproof roof covering, while an in-roof system replaces part of that covering and becomes part of the drainage plane. Integrated solar can look neater, but flashing, trays, drainage paths, ventilation and the surrounding tiles or slates must all be detailed correctly. The choice should follow the roof condition, appearance, cost and installer competence—not an assumption that one system can never leak.
Standards checked
This homeowner guide was reviewed against current material including:
Roof types and mounting products vary considerably. The certified mounting-system instructions, structural assessment and property-specific installation design take precedence over the simplified examples in this homeowner guide.
Related Tom Solar guides
Tom Solar view
Solar panels can remain in place for decades.
That means the roof underneath deserves at least as much attention as the shiny equipment going on top.
Before awarding the work, ask:
The homeowner should not have to simply cross their fingers and hope the roof is suitable.